Primitive fall décor—fabric pumpkin muffin in canning ring with coffee-grunge finish, cheesecloth topper, and “pumpkin muffin” tag on a crochet doily.

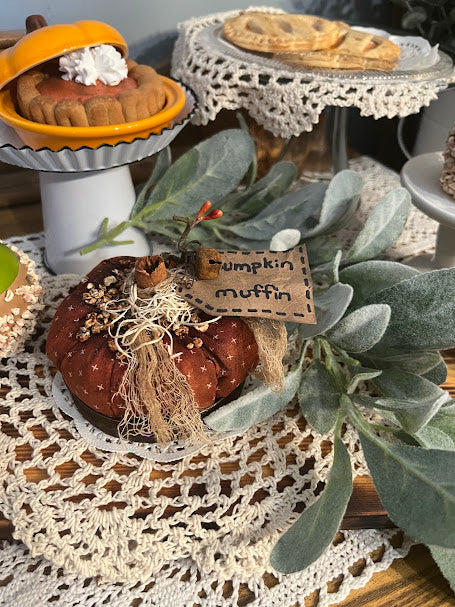
DIY Fabric “Pumpkin Muffins” (Primitive Fall Craft)

Looking for a cozy fall craft that looks good enough to eat—but is 100% décor? Try your hand at creating “Pumpkin Muffins” nestled into rustic canning rings. They’re primitive, grungy, and adorable on a tiered tray or kitchen vignette. If you'd like to watch the video in how I made these, here is the YouTube video link.

Supplies

  • Wide-mouth canning ring + lid
  • Black spray paint + bronze spray paint
  • Clear sealer (spray)
  • Ground cinnamon (for rusty speckles)
  • Hot glue gun & sticks
  • Mod Podge (matte) & a foam brush
  • Cotton fabric: approx. 4½" x 22" (per pumpkin)
  • Needle with large eye (doll needle works great)
  • Upholstery thread (stronger than standard)
  • Polyfill (budget hack: pull stuffing from a $3 pillow)
  • Coffee grunge mix (leftover coffee + cinnamon + vanilla)
  • Cinnamon stick (stem)
  • Optional toppings: faux “nuts,” cinnamon/allspice, cheesecloth (coffee-stained), excelsior or Spanish moss, pip berries, raffia
  • Kraft paper tag, ink/oxide, jute, tiny rusty bell or heart button

Step 1: Age the Ring & Lid

  1. Spray the lid black; mist with bronze while still tacky.
  2. While paint is wet, sprinkle cinnamon for a speckled, rusty patina.
  3. Seal with clear spray. Let dry.
  4. Hot-glue the lid inside the ring to make a shallow “muffin tin” cup.

Fixing blemishes: Dab Mod Podge where needed, sprinkle a touch more cinnamon, and seal again.

Step 2: Sew the Pumpkin Puff

  1. With right sides together, fold the 4½" x 22" fabric strip and stitch the long edge (a simple running stitch is fine).
  2. Run a gathering stitch around one open end to close it. Knot tight.
  3. On the other end, run another gathering stitch but do not close yet.
  4. Stuff firmly with polyfill; pull gathers tight and knot.

Pro tip: Use upholstery thread so you can cinch tightly without snapping.

Step 3: Create Pumpkin Ribs

Without cutting the thread, pass your long needle through the center top-to-bottom, pull snug to indent a rib, and repeat around to make six sections. Knot securely.

Step 4: Coffee-Grunge Finish

Brush on your coffee grunge (coffee + cinnamon + vanilla). For a deeper primitive tone, bake on low until dry—or let it sun-dry.

Step 5: Top Like a Muffin

  1. Brush a little Mod Podge on top and sprinkle faux “nuts,” cinnamon, and allspice.
  2. Hot-glue a cinnamon stick stem in the center; trim height as desired.

If spray sealer blows toppings off (ask me how I know!), switch back to dabbed Mod Podge and press into place.

Step 6: Cozy Embellishing

Tuck coffee-stained cheesecloth and a pinch of excelsior or Spanish moss around the stem. Add a curled pip berry sprig, a bit of raffia, and a tiny tag that reads “pumpkin muffin.” Ink the tag edges, crinkle slightly, then tie on with jute and finish with a rusty bell or heart button.

Display & Variations

Nestle your pumpkin into the aged canning ring or create a whole “pan” by aging a muffin tin and setting several inside. Try different fabric colors; keep embellishments coordinated (e.g., Spanish moss + heart button for brighter oranges; excelsior + rusty bell for darker, grungier tones).

Tips for Success

  • Sequence matters: Grunge + dry before heavy embellishing so toppings set cleanly.
  • Safety: If baking to dry, use low heat and keep an eye on spices/fabrics.

I hope you love this cozy little project! If you make one, tag me so I can share your “muffins” with our wildly creative crew.

Back to blog

Leave a comment